
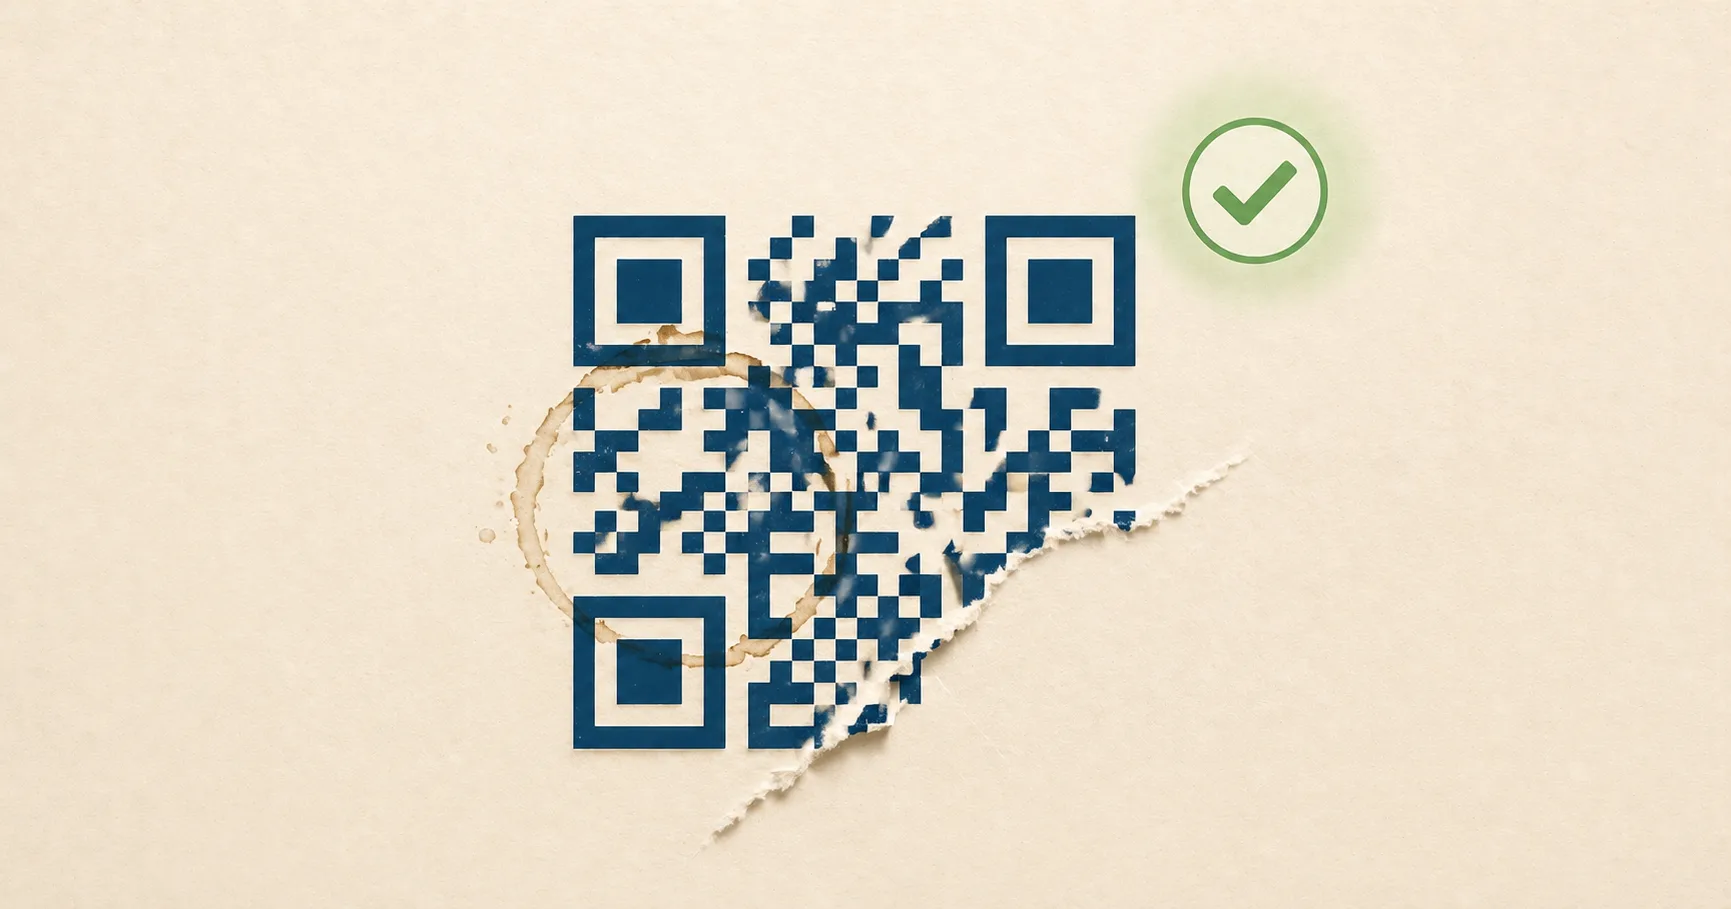
A QR codeA 2D matrix barcode that encodes data in a square grid of black and white modulesA single black or white square in the QR grid. The number of modules per side scales with the QR versionThe size of a QR code, numbered 1 (21×21 modules) through 40 (177×177). Higher versions store more data but require more printed space. Read more →, from 21×21 modules for version 1 up to 177×177 for version 40. Read more →. Read more → on a coffee bag survives a smudge of espresso. A poster gets a torn corner and still scans. A logo sits in the middle of an event ticket and the camera reads through it. None of that is luck. It’s error correctionMathematical redundancy built into every QR code that lets it scan correctly even if part of the matrix is damaged, dirty, smudged, or covered (for example by a logo). Read more → — extra redundancy baked into the QR pattern that lets a scanner reconstruct missing or corrupted data.
If you print QR codes, embed logos, or rely on long-lived signage, this is the setting that matters most. Pick the right level and your code shrugs off scratches. Pick the wrong one and a scuffed corner takes the whole thing offline.
What “QR code error” actually means
When QR documentation talks about an “error”, it almost never means an on-screen error message. It means a lost or corrupted module in the printed code — a single dark or light cell the camera could not read clearly. A smudge wipes out a dozen modules. A logo blocks a few hundred. A scratch nicks a corner. Each is an “error” the way Reed–SolomonThe error-correction algorithm used in QR codes (and on CDs, DVDs, and deep-space probes). Read more → coding theory uses the word: a symbol that disagrees with what the encoder originally wrote.
Error correction is how the QR specification turns that loss into something recoverable. The encoder writes redundant parity alongside the data so a scanner with most of the modules can rebuild the rest. The meaning is operational, not user-facing: it is the spec’s way of saying “this code can lose up to X% of its modules before it stops working.”
What error correction actually does
Error correction is not a vague quality boost. It is specific redundancy calculated from your payload using a method called Reed-Solomon error correction, the same family used in CDs, DVDs, and deep-space communications. The generator splits your data into blocks, calculates parity bytes for each block, and weaves both into the QR pattern. When some modules are unreadable, the scanner uses the parity to rebuild the original.
In practice, error correction helps when:
- a corner is smudged, scratched, or torn,
- the code is printed on textured material like cardboard or fabric,
- the camera reads at an angle and some modules blur,
- a logo or icon blocks part of the data area,
- glare washes out a strip of the code.
What it does not help with: a missing quiet zoneThe unprinted margin of at least four modules' width that must surround every QR code. Read more →, low contrast between modules and background, or a damaged finder patternThe three large squares in the corners (top-left, top-right, bottom-left) of every QR code. Scanners use them to detect a QR in the camera frame, lock onto it, and determine its orientation. Read more → in the corner. Those break scanning before error correction even gets a chance to work. For a refresher on the parts that have to stay intact, see how QR codes work.
Types of QR code errors error correction handles
The QR spec recognises two broad error types in a printed code, and the Reed–Solomon decoder treats them differently:
- Erasures — modules the scanner knows it cannot read. The location is known, the value is not. Typical causes: a torn corner, a sticker peeled off, a logo plate masking part of the data area.
- Substitution errors — modules the scanner reads as the wrong value without knowing it was wrong. Typical causes: ink bleed darkening a light module, a glare spot whitening a dark one, motion blur smearing one cell into the next.
The decoder can repair roughly twice as many erasures as substitution errors at the same correction level, because knowing where the damage is makes the math easier. That is why level H (≈30% recoverable) handles a logo (an erasure with a known boundary) more reliably than it handles a uniformly ink-bled scan of the whole code (a substitution error scattered everywhere).

In day-to-day terms, the error types that show up on real-world QR codes are:

| Error type | Cause | Recovers at |
|---|---|---|
| Smudge / ink bleed | Wet finger, espresso ring, low-quality print | M or higher |
| Torn corner | Sticker damage, packaging wear | Q if torn area ≤ 25% |
| Logo overlay | Centred brand mark on the data area | H, with logo ≤ 25% of area |
| Scratches | Laminated cards on busy reception desks | Q or H, plus matte lamination |
| Glare / reflection | Glossy stock under overhead light | Q, plus matte print |
| Camera angle blur | Phone tilted, motion at scan time | Alignment patternsSmaller square patterns scattered through QR codes from version 2 onward. They help scanners correct for perspective distortion when the code is photographed at an angle, on curved surfaces, or with a wide-angle lens. Read more → + M or higher |
| Faded ink | Sun-exposed signage over months | H, plus UV-stable ink |
The one type error correction cannot recover from: damage to the three corner finder patterns or the surrounding quiet zone. Those are what the scanner uses to locate the code in the first place; if they fail, the decoder never gets called. Always design layouts so the corners stay clean and the four-module quiet zone is preserved — see the QR anatomy walkthrough for which regions are reserved.
The four levels: L, M, Q, H
Every QR generator lets you choose one of four error correction levels:
- L (Low) — about 7% of codewordsAn 8-bit unit of data inside a QR code. Each version + ECLOne of four settings that controls how much damage a QR code can tolerate: L (about 7%), M (15%), Q (25%), or H (30%). Read more → combination has a fixed total split between data codewords (your payload) and error-correction codewords (the redundancy). Read more → can be recovered
- M (Medium) — about 15%
- Q (Quartile) — about 25%
- H (High) — about 30%
These percentages refer to the share of the data that can be reconstructed if it is unreadable. They are not promises. Real-world scan success depends on print quality, lighting, camera, and which parts of the code are damaged. A code with 25% of its area destroyed in one big chunk near a finder pattern will fail at any level. The same 25% scattered across the data area is recoverable at H.
Most generators default to M because it covers the typical print case without bloating the pattern. Fast QR exposes the level on every generator so you can match it to the job: see URL to PNG, URL to SVG, or URL to JPG.
Higher correction means denser codes
Here is the trade-off everyone forgets. More redundancy means more bytes in the pattern. More bytes mean a higher QR version (a larger grid of modules) for the same payload. At a fixed printed size, a higher version means smaller individual modules. Smaller modules are harder for a phone camera to resolve, especially in low light or from a distance.
So “always use H” is not a free upgrade. The right level depends on:
- payload length (a 30-character URL versus a 200-character URL),
- final printed size,
- whether you are adding a logo,
- viewing distance and lighting,
- and the worst phone camera you expect to encounter.
A short URL printed at 5 cm on a clean menu can use H without trouble. The same payload at H, shrunk to a 1 cm square on a foil pouch, will struggle. The fix is usually shorter payload or larger print, not lower correction.
Safe default error correction levels by use case
The “safe” level — the one that handles the average production deployment without forcing you to think about it — is M for most printed codes and H whenever a logo is involved. That single rule covers maybe 80% of jobs. The rest is matching the level to the worst conditions the code is expected to meet:
- No logo, large print, controlled environment — M is plenty. Restaurant menus, business cards, posters indoors.
- Small print, harsh lighting, or outdoor exposure — Q or H. Packaging, parking signs, stickers on metal.
- Logo in the center — H, paired with a code that is large enough that the remaining modules stay crisp.
- Digital screens only, never printed, payload very long — L can be acceptable. Damage is not a risk and you save module density.
If your printed surface lives in a rough environment — kitchens, warehouses, outdoors — bump correction up and increase physical size. The two together cost you nothing once the print is set up.
How logos interact with error correction
When you drop a logo in the middle of a QR code, you are deliberately blocking modules. The scanner can still recover the data if three things hold:
- the blocked area is within what your error correction level can recover,
- the quiet zone and the three finder patterns in the corners stay untouched,
- and the surrounding modules remain crisp and high contrast.
Some practical logo guidance:
- Keep the logo around 20-25% of the code area at most. H tolerates up to 30% damage in theory, but you want headroom for print imperfections.
- Use a solid plate behind the logo. A white circle or square stops the logo from visually merging with surrounding modules and confusing the scanner.
- Never cover finder patterns or alignment patterns. The big squares in three corners and the small squares on the grid are how the scanner orients itself. Damage them and the code fails before error correction is consulted.
- Test on cheap phones. Newer iPhones and Pixels are very forgiving. A five-year-old budget Android is the real test.
For more on visual design without breaking scans, see QR code design best practices.
What makes codes denser (and how to fight back)
A dense QR pattern has more, smaller modules. Density goes up when:
- payloads are long, especially URLs with tracking parameters,
- correction is high,
- you encode raw text instead of linking to a hosted page.
If your code feels too dense to print small, the most effective fix is almost always the payload, not the correction level. Three things to try:
- Shorten the URL. Drop unnecessary query parameters. Use a short canonical path on your own domain.
- Use a redirect on a domain you control. A path like
go.brand.com/menuis short, stable, and editable. See static vs dynamic QR codes for the trade-offs. - Link, don’t embed. A QR code carrying a 500-character paragraph of text will be huge. The same code carrying a URL to a page with that paragraph is tiny.
In real deployments, shortening the payload moves the needle far more than tweaking error correction.
Error correction is not a substitute for good print
Even with H, a code still needs:
- a clean quiet zone of at least four modules around all edges,
- high contrast between modules and background (dark on light, please),
- enough physical size for the scan distance you expect,
- and a format that preserves edges. Vector SVG for print, high-quality PNG for screens.
If a QR code is tiny, low contrast, and crammed against the edge of a label, error correction will not save it. For exact size guidance, see QR code size and print guidelines, and the colored QR code guide for the contrast ratios that keep brand-coloured codes scannable in the first place.
A quick test before you commit to a level
If you are unsure, do not guess. Run a five-minute test:
- Generate the same payload at M and at H.
- Print both at the smallest size you plan to deploy.
- Scan each from arm’s length on at least three phones, including one older Android.
- Try in dim light, with a slight angle, and at the maximum expected distance.
- If H scans noticeably slower because it is denser, increase the printed size or shorten the payload — do not drop to L.
The goal is not maximum redundancy. The goal is fast, consistent scanning across the messy conditions your code will actually meet.
Sources
- Wikipedia — QR code (Error correction) — Levels L/M/Q/H, capacity trade-offs, and recovery percentages.
- Wikipedia — Reed–Solomon error correction — The mathematical algorithm behind QR error correction.
- Denso Wave — Error correction feature — Inventor’s overview of error correction in QR.